How to Adjust Check and MICR Encoding Line Printing Position
ezCheckPrinting software saves your time by printing a check with MICR encoding on blank stock. Most customers can use the default set up to print a check. However, if your printer is special and the MICR line is too too high or too low, you can adjust the printing position by moving the entire check.
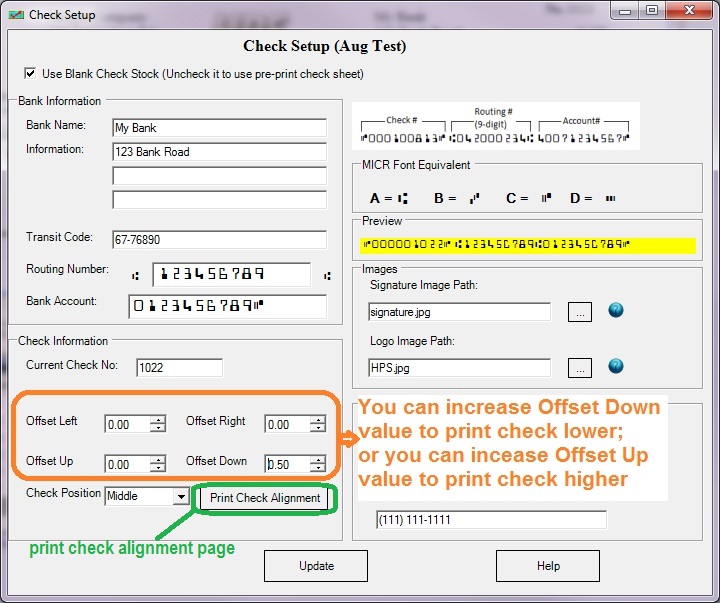
You need to open check setup screen and adjust the check print out position by modifying the "Offset left", "Offset right", "Offset up" or "Offset down" value. If you need to print the check lower, you can increase the value of "Offset down" to print the check lower.
(Note: If you just need to adjust one field on check (ie: company address), you can customize this field on check layout setup screen. View more details
here.)
Here are the instructions on how to edit check alignment.
 | Design and Print Professional Checks Yourself
- Print checks on blank stock with logo and signature
- Fill in data on pre-printed checks
- Print blank checks to fill in later
- QB virtual printer for QuickBooks/Quicken(for Windows)
- Unlimited accounts and checks for Windows and Mac.
Try ezCheckPrinting free demo version with no obligation and no credit card needed.
|
 Sample: How to print a check higher
 Step 1: Start ezCheckPrinting and Open check setup screen by clicking the top menu "settings->check set up"
Majority customers can use the default value "0" for "Offset left", "Offset right", "Offset up" and "Offset down". However, each printer is unique. Some customers may need to adjust the offset value(s) to print checks.
Step 2: Adjust offset values
You can edit the offset values to move check. For example: If you need to print the check higher, you can increase the value of Offset Up. If you need to print the check lower, you can increase the value of Offset Down.
These offset value are in inch. You can test it by changing offset value to 0.5 first. Print a test check. Then increase/decrease it to adjust printing position if needed.
Step 3: Save your change and print a check
You can repeat
Step 2 & 3 if needed.
Note: how do I know if the check is properly aligned
You can print out "Check Alignment Page" and align your check on the bottom and right line to check if the Routing Number fits inside the correct box. The "Print Check Alignment" button is on "Check Setup Page". The Routing Number includes the leading symbol.
Related Links:
How to print paychecks on balnk stock How to print personal check on blank stock How to Print QuickBooks Check on Blank stock How to Print pre-printed check with MICR Encoding to fill in manually How to Print check with logo How to Print check with signature How to print check draft to collect payment online