ezCheckPrinting: How to Customize the Address Field on Check
ezCheckPrinting allow users to designe and print professional checks easily in house. You can follow this guide to customize the address field.
Who Can Use This Guide
Follow this guide if you need to customize any field on your check layout (e.g., Payee Name, Date, Amount, Payee Address, Logo, Signature, or Memo).
Note: To adjust the position of the MICR line (printing it higher or lower on the check), please refer to our dedicated
MICR Line Adjustment Guide.
Step by Step Guide
Step 1: Launch ezCheckPrinting
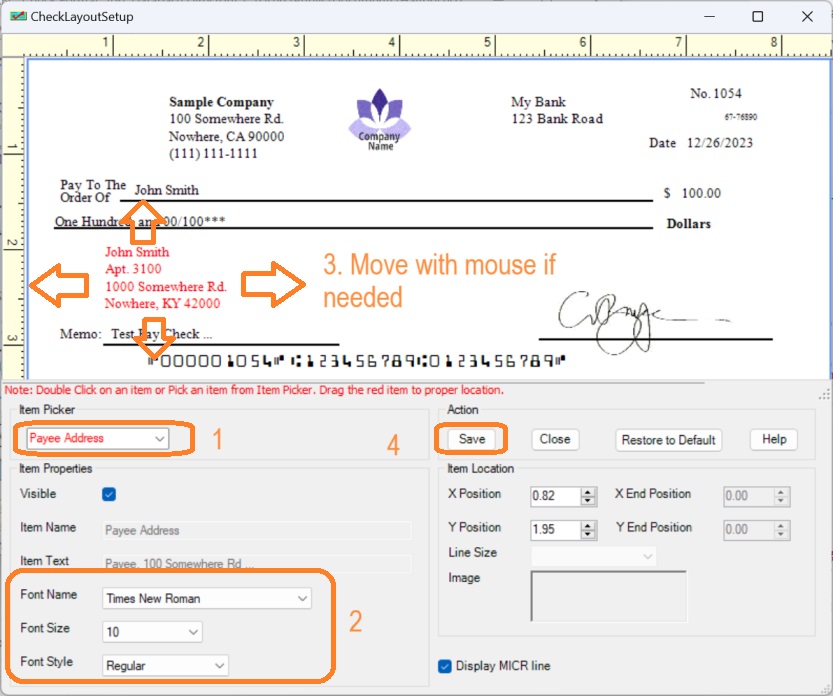
Step 2: Click the top menu "Settings->Layout setup" to open Layout setup screen
Choose Payee Address (or your desired field) from the item picker dropdown, or simply double-click the field directly on the screen.Modify the font type, edit the font size, or click and drag the field with your mouse to reposition it.Step 3: Click the Save button to apply the updated layout.
More information
How to customize the check layout
Follow this guide to design a signature, add a new field, hide a field and more.How to adjust the printing alignment
 | Design and Print Professional Checks Yourself- Print checks on blank stock with logo and signature
- Fill in data on pre-printed checks
- Print blank checks to fill in later
- QB virtual printer for QuickBooks/Quicken(for Windows)
- Unlimited accounts and checks for Windows and Mac.
Try ezCheckPrinting free demo version with no obligation and no credit card needed.
|
Related Links:
How to print paychecks on balnk stockHow to print personal check on blank stockHow to Print QuickBooks Check on Blank stockHow to Print pre-printed check with MICR Encoding to fill in manuallyHow to Print check with logoHow to Print check with signatureHow to print check draft to collect payment online