What Permissions Do I Need to Run ezCheckPrinting Correctly
1. Permissions
ezCheckPrinting software is the easy-to-use and affordable check writing & printing software for any business. To run ezCheckPrinting correctly, you need to have at least
read,
write and
execute permissions to access the following folders and the files inside the folders.
1.1.
Datebase folder
The default data folder path is:
C:\Users\Public\Documents\Halfpricesoft\ezCheckPrinting
1.2.
Application folder
The default application folder path is:
C:\Program Files (x86)\Halfpricesoft\ezCheckPrinting
2. How to view folder permission
2.1. In Windows Explorer, right-click the file or folder you want to work with.
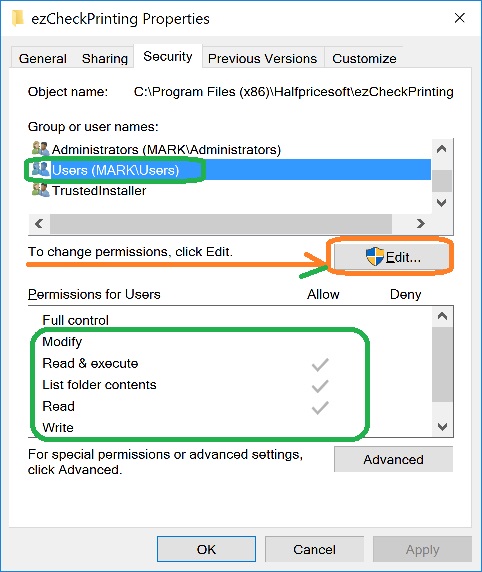
2.2 From the pop-up menu, select Properties, and then in the Properties dialog box click the Security tab.
2.3 In the Name list box, select the user, contact, computer, or group whose permissions you want to view.
3. How to edit folder or file permission
3.1. Right-click the file or folder for which you want to set permissions, click Properties, and then click the Security tab.
3.2. Click Edit to open the Permissions
3.3 In the Name list box, select the user, contact, computer, or group.
3.4 Select the
Allow or
Deny check box.
3.5 Save the changes
4. Sample: How to view and edit the permissions
If you do not have enough permisisons, you may not be able to start an application or you will get database error when you save a new check or form. Please make sure you have enough permissions.
4.1 Open Windows Explore, navigate to the database folder
The default database on your machine is:
C:\Users\Public\Documents\Halfpricesoft
4.2 Select the ezCheckPrinting folder by mouse, right click.
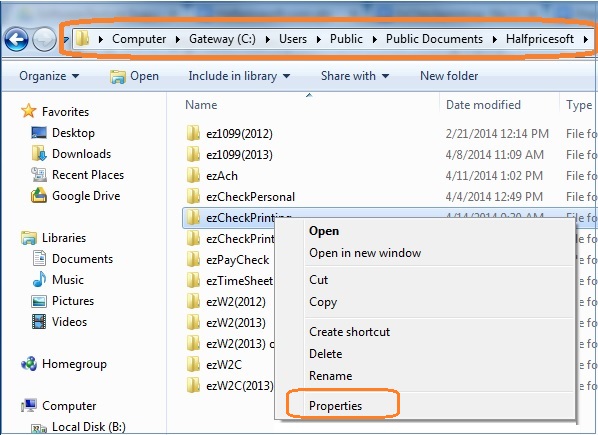
4.3 From the pop-up menu, select Properties, and then in the Properties dialog box click the Security tab. You need to have at least read, write and execute permisson.
4.4 Click Edit to open the Permissions
4.5 Select the
Allow check box for
FULL CONTROL.
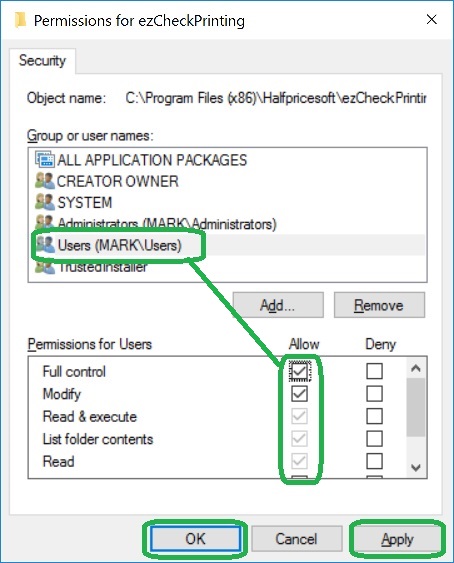
4.6 Apply and save the changes
4.7 Please repeat step 4.1 to 4.3 to double check if you have updated the permissions successfully. If not, you need to contact the system administrator in your company for help. You may not have the permissions to change settings.
Related Links:
How to print paychecks on balnk stock How to print personal check on blank stock How to Print QuickBooks Check on Blank stock How to Print pre-printed check with MICR Encoding to fill in manually How to Print check with logo How to print check draft to collect payment online
 | Design and Print Professional Checks Yourself
- Print checks on blank stock with logo and signature
- Fill in data on pre-printed checks
- Print blank checks to fill in later
- QB virtual printer for QuickBooks/Quicken(for Windows)
- Unlimited accounts and checks for Windows and Mac.
Try ezCheckPrinting free demo version with no obligation and no credit card needed.
|